How to Grow Sprouting Seeds for Winter Salads
Have you been wondering how to enrich your salads during the winter time when there aren’t many fresh greens available?
Then look no further and keep reading to find out a secret ingredient that will put a whole new flavor to your winter salad.
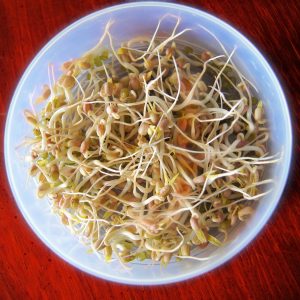
Sprouting seeds are delicious and nutritious seeds that you can grow at your home. They contain a considerable amount of vitamin C, fiber and protein, and a small amount of B vitamin, magnesium, iron, zinc, calcium, potassium, and phosphorus.
The entire process is incredibly fast and easy, so you can expect to have your sprouting seeds ready in several days. Besides, you’ll enjoy the growing process which will make the fruits of your labor even sweeter.
Grow sprouting seeds with jar method
The simplest way to grow sprout seeds is to use the jar technique. You don’t need fancy equipment, just a good old jar or any similar container. The whole process is pretty straightforward, and it looks like this:
– First, add one or two tablespoons of sprouting seeds to the jar you’ve chosen. Then, fill the jar with water. If you’re wondering if this is a small amount of seeds, no worries – they will grow and fulfill the entire vessel. The last step of this initial phase is to leave the sprouting seeds to soak during the night, usually for eight hours or more for beans or larger seeds.
– Once the soaking time is completed, remove the water from the jar. To do that, you’ll need a piece of gauze, cheesecloth, muslin, or similar material and elastic band. Just cut a round piece of fabric that will cover the open part of the jar and tighten it with an elastic band. Then, drain the water off by moving the vessel upside-down. When all water is out, remove some appended seeds by smoothly tapping the fabric. Finally, leave the jar in a dark, warm place to initiate germination.
– Rinse the seeds twice a day. It is recommended to rinse them in the morning and in the evening. Just pour the water in the jar, give it a few gentle spins and then throw water out, as previously explained.
– When sprouting seeds reach the size of 1-5cm, then they can be used in your winter salads. However, the size is a subjective preference – somebody may prefer them longer, so there are no rules regarding size. Before eating your sprouting seeds, make sure you put them in the light place for a couple of days. That way, they’ll have a batter taste and more beautiful color.
Grow sprouting seeds with sprouting kits
Sprouting kits represent a more advanced method for growing sprouting seeds. However, don’t worry, this doesn’t mean that the whole process is more complicated and time-consuming. Just the opposite.
Sprouting kits are so economical, it won’t cost you a fortune to buy them, and more importantly, they facilitate even more this already simple process thanks to a mechanism of several levels of trays they have. Each of the trays has slats in the bottom to enable the drops of water to go through.
A difference from the jar method, these trays offer significant flexibility because you can grow various types of seeds in every tray and you can grow them in different stages to make sure you have a constant supply of new sprouts.
Sprouting kits make rinsing a breeze. Simply put the kit under the water and let the water pass through the mechanism of trays and bottom tier. Remaining water will be caught by a reservoir that can be discharged after draining.
Also, keep the kit in the dark place during the germination process and put it in the light a couple of days before preparing the sprouting seeds.
Here’s a kit from The Herb Cottage that’s so easy to use.
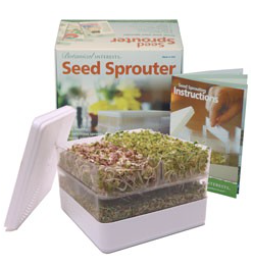
Sprouter with Instruction Booklet
Grow sprouting seeds with sprouting sacks
In case you want to grow sprouting beans, then you should opt for sprouting sacks method.
Sprouting sacks can be purchased at the store as burlap or hessian sacks, or handmade as drawstring version using linen, cotton or any other permeable material.
The first step is to put the seeds you already soaked into the sprouting sack. As for the rinsing process, just place the whole sack under the water twice a day. Don’t forget to move the sack around gently while under the water. Drain the water off by tipping the sack upside-down.
Sprouting beans don’t need light during the whole process, so when they grow big enough, they are ready to eat.
Bon appetit
Keep your sprouts in a plastic bag and place it in the fridge. They will be fresh for a week, just make sure you give them a splash of water after a couple of days.
Enjoy your crunchy and delicious salad rich with vitamins and minerals that will keep you healthy this winter.

The Herb Cottage has a great selection of sprouting seeds. Visit the Sprouts Page.
BIO
Hillary Hope is a creative writer, a vegetarian foodie, and yoga practitioner. She works as a professional writing help and loves spreading the word about healthy diet and lifestyle. Make sure you try out some of her yummy recipes!