The buzz about bees may primarily center around their honey, but the truth is that these little creatures are beneficial to their local environments in many ways. For those looking to welcome bees into their own backyards, setting up a beehive a great first step. A simple project with a sweet reward, backyard beehives are the perfect way to better your home and community environment.
If you’re interested in starting your own beehive at home, here are the basics you should cover.
Step 1: Determine the Specifics
Investing in bees is like investing in a new pet. While you may not be naming every single bee and throwing parties for their adoption anniversaries, bees are no less deserving of a loving and nurturing environment than other animals. Make sure to consider the space you have available, the surrounding environment and even laws that may impact your bee hives.
It is also crucial to invest in high-quality bee protection gear. A hat and veil combination suit is perfect for keeping bees from flying into or getting entangled in your hair while protecting yourself from the sun. A lightweight jacket offers a great way to stay clean and escape any accidental stings, as well.
Step 2: Set Up Your Frames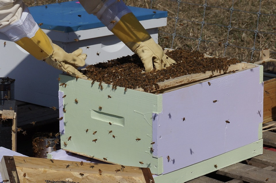
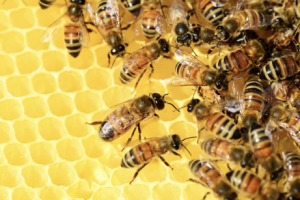
Frames are a crucial part of every bee hive, as they guide bees to create honey in the right spots. Backyard hives usually consist of 10 frames in the bottom two sections of the hive, also known as the brood boxes. Bee hives are generally made in three sizes: Shallow, medium and deep, and should be kept at least 18 inches off the ground on hive stands, which can typically be made with 2×4’s and cement blocks.
Step 3: Assemble Your Hives
Make sure to build your hives ahead of your bees’ arrival so that you can facilitate a smooth transition. Hives include vertical sheets of beeswax in two levels, one for raising bees and the other for storing honey. You can find instructions to build a hive online, purchase a kit or even opt for a pre-built hive from a fellow beekeeper.
Step 4: Get Your Bees
There are numerous breeds of bees available for purchase, but the three most common types are Italian bees, Russian bees and Carniolans. Italian and Russian bees produce a lot of honey and are usually a more popular selection for new beekeepers because their relatively laidback temperament is easy to work with, while Carniolans usually have a slower honey production rate and are known for a defensive nature. Regardless of what type of bee you choose, the best way to purchase them is to find a local beekeeper who is willing to sell. He or she will be able to tell you how they have maintained that specific hive thus far and can likely show you tips and tricks that you may not know as a new beekeeper.
Step 5: Put the ‘Bee’ in ‘Beehive’
Most new bees will come in packaging that has a limited food supply, so you will need to introduce them to the new hive within a day of receiving them.
- After removing the top and inner covers of your hive, take out a few frames of the hive body to provide some room to work.
- Remove the feeder can from your new bees and place a barrier in front of the hole so the bees don’t escape.
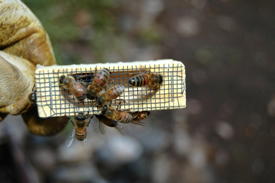
- Look for a string or strap at the top of the box and use that to carefully pull out the queen bee’s cage.
- Take out the cork on the queen’s cage and quickly cover the hole with your finger until you can find something soft to replace it with. A marshmallow or something else sweet is perfect, as the bees will eat through it over the next few days to help the queen escape.
- Attach the queen’s cage to the middle of the center hive frame with a thumb tack or something similar. The cage’s screen should face sideways when placing the frame back in the hive.
- Remove the barrier you placed over the bees’ escape hole and pour them over the hive frames and body.
- Starting with the ones closest to the queen’s cage, carefully replace the hive frames. Once the majority of the bees are in, put the inner and top covers back on the hive and place the bees’ packaging on top so any remaining bees will make their way back to the hive.
- After about half an hour, place the entrance reducer in front of the hive.
Step 7: Provide Some TLC
While the bees work to protect their queen and produce honey, it’s up to you to take care of the hive itself. Make sure to fix any damaged hive pieces, maintain entrance blocks, replace beeswax, install covers for rain and shade, provide a lot of ventilation, and reduce any termite or animal interaction with the hive.
With a little TLC and effort, your backyard environment can start receiving the benefits of bees in no time. Keep your hive in great condition and your bees will remain happy as you get the sweet reward of fresh honey every year.
Written by Jordan McDowell
Image 1: https://pixabay.com/en/honey-bees-beehive-honey-bees-326337/
Image 2: https://pixabay.com/en/beekeeping-bees-honey-frames-1537156/
Image 3: https://pixabay.com/en/bee-spring-flower-macro-nature-515023/
Image 4: https://pixabay.com/en/bees-queen-cage-beekeeping-682940/